The Process of Information Retrieval

Information Retrieval (IR) is the activity of obtaining information from large collections of Information sources in response to a need.


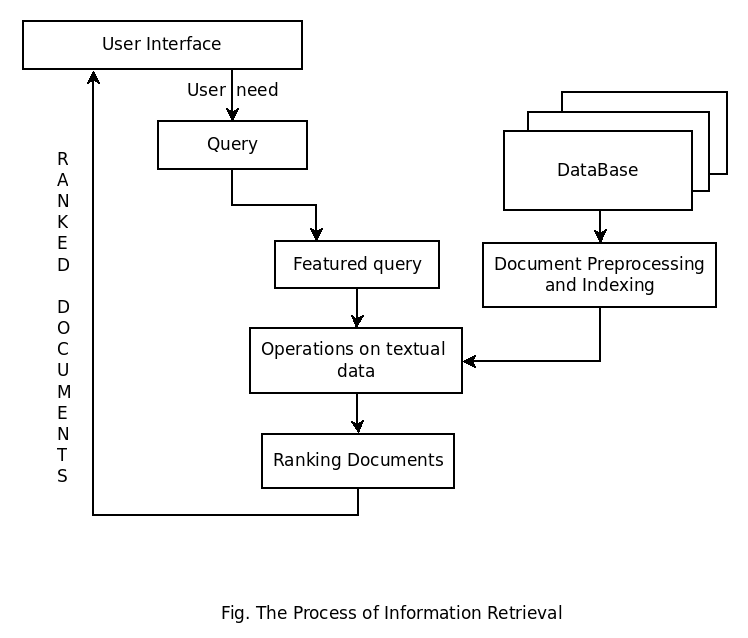
The working of Information Retrieval process is explained below

  • The Process of Information Retrieval starts when a user creates any query into the system through some graphical interface provided.
  • These user-defined queries are the statements of needed information. for example, queries fork by users in search engines.
  • In IR single query does not match to the right data object instead it matches with the several collections of data objects from which the most relevant document is taken into consideration for further evaluation.
  • The ranking of relevant documents is done to find out the most related document to the given query.
  • This is the key difference between the Database searching and Information Retrieval.
  • After the query is sent to the core of the system. This part has the access to the content management module which is directly linked with the back-end i.e. the large collections of data objects.
  • Once results R are generated by the core system then it is returned to the user by some graphical user interfaces.
  • The process repeats and results are modified until the user satisfied for what he is actually looking for.

The Following figure sketches processing of textual queries performed by
an Information Retrieval system.

ir-arch

The Operations on Textual data of documents are illustrated in the figure below ->

textprocarch
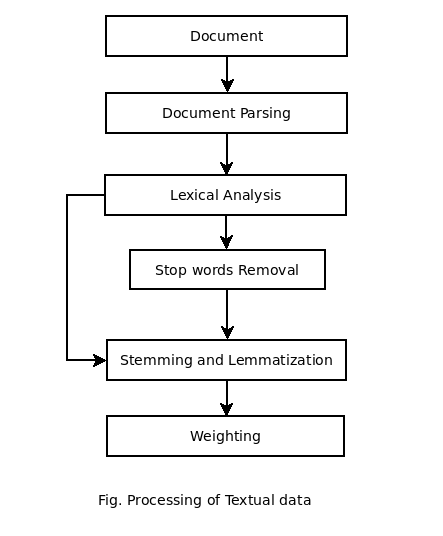
Above figure sketches the Processing of textual data typically performed by Information Retrieval engine, by taking a document as input and yielding its index terms.

1. Document Parsing

The Documents  comes from different source combinations such as multiple languages, formattings, character sets; normally, if any document consisting of more than languages. e.g. Consider a Spanish mail which has some part in french language.

Thus Document parsing deals with the overall document structure. In this phase, it breaks down the document into discrete components. In Preprocessing phase it creates unit documents for example one document representing emails and another as additional specific part.

2. Lexical Analysis 

In Lexical analysis, tokenization is the process of breaking a stream into words, phrases, symbols, or other meaningful terms called tokens. These meaningful elements ae further sent to Parts of Speech Tagging.

Typically, Tokenization occurs at a word level.

3. Stemming and Lemmatization

In English grammar, for correct sentence structures, we often use different forms of any word. e.g. go, going, goes etc. Stemming is the process of cutting down the affixes and let the root word be found out. Any word is formed using regular noun +  plural affix. check more on  A Cognitive study of Lexicons – by Shirish Kadam

Lemmatization usually refers to doing these things properly with Vocabulary and Morphological analysis of words. Aiming to remove inflectional endings only.

Further Reading :

Setting up Android Studio on Ubuntu and Linux Mint Rosa


Following are the steps to install the Android Studio Environment on Linux systems such as Linux Mint and Ubuntu.

Andoid Studio needs JDK to be installed so please install it by typing following command on terminal if already installed the skip

sl3lab@practnode0:~/Documents/android-studio/bin$ ] sudo apt-get update

sl3lab@practnode0:~/Documents/android-studio/bin$ ] sudo apt-get install default-jdk

  1. Download the Android Studio and the SDK tools from

    download android-studio and sdk

Now for 32-bit Linux System :

1.No need to install any additional libraries you can simply go further by extracting the android-studio.zip or tar.gz file

  1.   Now go in the extracted directory of android-studio from terminal
  1. Again go in the /bin directory using   $]cd bin
  2. now from that directory run the following command

sl3lab@practnode0:~/Documents/android-studio/bin$ ./studio.sh  and hit enter

and left that terminal open…

  1. Click on Next Next then It will Ask to Setup Proxy for the Android SDK tools Click on Cancel
  2. Now go in Configure (the second last option )—>go in Projects Defaults—->Project Structure
  3. Now you have Installed JDK so the path of the JDK will come automatically there

for the Android SDK Location set path of extracted android-sdk_r24.4.1-linux.tgz

and click OK.

now you have Successfully installed the Android Studio Environment on 32 bit.

Now for 64-bit Linux System :

The Problem with the 64 bit system is that Android SDK are of 32 bits in size so you need to install the lib32 libraries so that your 64 bit system would understand them…

it can be done by running following command in terminal

sl3lab@practnode0:~$ ]sudo apt-get install lib32z1 lib32ncurses5 lib32bz2-1.0 lib32stdc++6

if it says that…

E: Unable to locate package lib32bz2-1.0

E: Couldn’t find any package by regex ‘lib32bz2-1.0’

then go with following steps:

  1. sl3lab@practnode0:~$ ]sudo apt-get install lib32z1
  1. sl3lab@practnode0:~$ ]sudo apt-get install lib32ncurses5
  1. sl3lab@practnode0:~$ ]sudo apt-get install libbz2-1.0:i386
  1. sl3lab@practnode0:~$ ]sudo apt-get install lib32stdc++6

and Now run the same steps as mentioned for 32 bit system…

Set path for Android SDK and JDK(automatically comes).

You have successfully installed the Android Studio Environment on 64 bit.

Hurray That’s done…!

Author :

AMIT GUNJAL

Amrutvahini College of Engineering, Sangamner

Installing Apache, PHP and Mysql (LAMP ) on Ubuntu and Linux Mint

Step 1 Install Apache

  1. sudo apt-get update
  2. sudo apt-get install apache2

After this Open Browser and visit http://localhost

it will show you that Apache Server in installed

Step 2 Install MySQL

  1. sudo apt-get install mysql-server

after this step it will ask for permissions click yes to all it shows..

Step 3 Install PHP

  1. sudo apt-get install php5

now use terminal and type the cd commands to go to /var/www/html

now create a file there i.e.

phpinfo.php

and type


Save the code.

and open browser again and go to

http://localhost/phpinfo.php

it will shows that PHP is install and its Details.

Now LAMP server is install on Your ubuntu System.

Terms and Conditions:

All the commands are need to be performed under root user.

to go to root shell

type in terminal

sudo -i

now it asks for current user password type whatever it may be and hit enter

now you are a root user.

further you can change root password by passwd command..

Hurray that’s done..!